Showing posts with label cookies. Show all posts

Thursday, December 8, 2011

Eggnog Cookie Cups

I didn't use to like eggnog. For some reason, now, I can't get enough of it. I've already gone through about a gallon of it this season, so maybe it's just a grown-up thing. Or maybe it's the rum.

Either way, I found this Taste of Home recipe hiding in my email folder and figured I would channel my new eggnog obsession elsewhere.

Mix together the pudding, milk and eggnog in a small saucepan. Cook and stir until it begins to boil. Add half of the extract to the mixture.
Transfer the hot mixture to a small bowl...
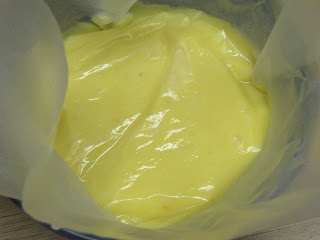
...and cover the top with waxed paper. This will let the pudding set up without forming a skin on the top. Refrigerate overnight.
To make the cookie dough, cream together the butter and brown sugar.

Beat in the egg yolks and the rest of the extract.

Gradually add in the flour and salt.
Okay, this is where I stopped reading the instructions. I added in the sugar, allspice and nutmeg into the cookie dough. It did occur to me that maybe that was a heck of a lot of sugar, but, did not question my non-reading of the actual procedure. You are actually supposed to mix the sugar and spices together and roll cookies in that. Do what you want. Either way, you will come out a winner here.
Roll the dough into small (1 inch) balls and place in a greased mini muffin pan.
Use the end of a wooden spoon to made a small indentation in the middle of the ball of dough. Spread the dough out so it moves up the side of the cup.
Bake at 350 for 10-15 minutes. While the cookie cups are still warm, use your wooden spoon again to make a small bowl.
The next day, get your eggnog pudding mixture out of the fridge. I have an electric cookie press my brother gave me that I use to fill these cookies. I have yet to press any cookies, but it is a wonderful tool to add filling to cookies and deviled eggs.
Aren't they pretty?
Not only are they pretty, but they are divinely delicious. The dough by itself could make an incredible cookie all by itself. I am slightly ashamed to admit that I ate these for breakfast one Saturday morning. Although, I dare you to avoid that temptation when you make them.

Click here for Printable Recipe

Eggnog Cookie Cups
1 package (3 ounces) cook-and-serve vanilla pudding mix
1-1/2 cups eggnog
1/3 cup milk
2 teaspoons rum extract, divided
1 cup butter, softened
1/2 cup packed brown sugar
2 egg yolks
2 cups all-purpose flour
1/8 teaspoon salt
1/4 cup sugar
1/8 teaspoon ground allspice
1/4 teaspoon ground nutmeg
In a small saucepan, combine the pudding mix, eggnog and milk. Cook and stir until mixture comes to a boil. Remove from the heat; stir in 1 teaspoon extract. Transfer to a small bowl. Cover surface of pudding with waxed paper; refrigerate until chilled.
In a large bowl, cream butter and brown sugar until light and fluffy. Beat in egg yolks and remaining extract. Combine flour and salt; gradually add to creamed mixture and mix well.
In a small bowl, combine sugar and allspice. Shape dough into 1-in. balls; roll in sugar mixture. With floured fingers, press onto the bottom and up the sides of well-greased miniature muffin cups.
Bake at 350° for 10-15 minutes or until light golden brown. Immediately remove from pans to wire racks to cool completely.
Just before serving, pipe or spoon pudding into cups. Sprinkle with nutmeg. Store in an airtight container in the refrigerator. Yield: 2-1/2 dozen.

Saturday, November 12, 2011

Banana Whoopie Pies


There are a lot of really amazing things about coaching cross country. The kids. The camaraderie. The competition. The bananas. 

Oh, you didn't know about the bananas? 

Hang around any runner long enough and bananas will become a staple in your diet. Every week, our parents supply snacks and it is a good bet that there will be bananas somewhere in that cooler. They are great for kids to eat before a race, but when they are done every one wants something a little more substantial. This means there are going to be leftover bananas. As coach, I often end up with what is left over at the end of the day.

This year, I was on the ball and mashed up the leftovers and stuck them in the freezer. After I made banana bread. And banana pancakes.

And these.

The Boy loves, and I mean LOVES, whoopie pies. We make them quite a bit, so we have had to try all different kinds.

These turned out to be one of my favorites yet. We had them for a snack. We had them for dessert. We had them for breakfast. They are that good.

Cream together 1/2 cup each of butter, sugar and brown sugar.
 Beat in an egg.
In a separate bowl, mix together 1/2 cup sour cream and 1/2 cup mashed banana. Does ANY one else ever start singing the crazy monkey's mashed banana song from the Lion King? Just me? Really?
 Add half the sour cream mixture to the sugar mixture.
 Add in half of a mixture of 2 cups flour and 1/2 teaspoon each of salt, baking soda and baking powder. Alternate with the banana mixture.
 I use a large cookie dough scoop to make scoops all roughly the same size. I have seen whoopie pie cookie sheets. I must have one.
For the filling, mix together two packages of cream cheese with a cup of powdered sugar. Spoon about a tablespoon onto one cookie and sandwich with another.
So I was going along, happy as can be, making delicious cookie sandwiches, when I realized that I was going to run out of filling. Instead of making another batch, I added in a half a cup of peanut butter. This turned out to be a stroke of genius.
 Banana. Cream cheese. Peanut butter. Oh my.

These didn't last long. So I made more. Make a double batch right out of the gate. You will thank me.


Click here for Printable Recipe

Banana Whoopie Pies
2 Cups Flour
1/2 teaspoon Baking Powder
1/2 teaspoon Baking Soda
1/2 teaspoon Salt
1/2 Cup Mashed Ripe Banana
1/2 Cup Sour Cream
1/2 Cup Unsalted Butter, Softened
1/2 Cup Granulated Sugar
1/2 Cup Brown Sugar
1 Egg
1 teaspoon Vanilla
16 ounces Cream Cheese, softened
1 Cup Powdered Sugar
Preheat oven to 350 degrees. Line 2 baking sheets with parchment. Sift flour, baking powder, baking soda, and salt into a bowl. Combine banana and sour cream in another bowl. Beat butter and sugars with a mixer on medium-high speed, until creamy, about 3 minutes. Add egg and 1/2 teaspoon vanilla, beating until incorporated. Add banana mixture in 2 additions, alternating with flour mixture. Use a large cookie scoop to spoon batter into 1 1/4-inch rounds on baking sheets, spacing rounds 1 1/2 inches apart. Bake until edges are golden, about 12 minutes. Let cool.
Beat cream cheese, confectioners' sugar, and remaining 1/2 teaspoon vanilla with a mixer on medium speed until smooth, about 2 minutes. Spoon 1 tablespoon cream cheese mixture onto the flat sides of half the cookies. Sandwich with remaining cookies. Dust with confectioners' sugar, and serve immediately.

Sunday, October 30, 2011

Dracula's Dentures

For years now, The Girl has been wanting me to let her take treats to her class Halloween party. I love Halloween, but this is never a good time of the year for me to try to add in anything, no matter how small.

This year, somehow, she talked me into it. We then hem-hawed around, putting it off until finally, this morning, we sat down to figure out what to make.

I get a newsletter from Nestle and these adorable treats were apart of last weeks update. The Kids fell in love and we ended up making these.

You need some cookies. Of course, Nestle wants you to use chocolate chip, so we did. Next time (and I'm sure there will be a next time with these) I think I will use sugar cookies. The chocolate chips just add in a whole new dimension of mess to this project.

You also need cookies that are more or less round so they match up. You could even (gasp!) use store bought cookies. Either way, they need to be pretty big. About three inches across is good.

Cut a cookie in half.
Spread a nice layer of red tinted frosting onto both halves.
Add mini marshmallows in a semicircle along the front edge to create the teeth. Another one in the middle helps to stabilize the whole thing.
Put the two cookie halves together to form a mouth.
Slivered almonds on either side of the two front teeth make the fangs.

These are the cutest scary cookies ever. They are really simple to make. Kind of messy and not really quick, but not difficult, either. So far, everyone who has seen them have laughed out loud.


Click here for Printable Recipe


Dracula’s Dentures
24 - 3 inch round cookies
1/2 cup prepared vanilla frosting, tinted red or pink
1 3/4 cups miniature marshmallows
48 (about 1 tablespoon) blanched slivered almonds

Cut each cookie in half for a total of 48 halves.
Frost bottoms of all cookie halves with frosting. Place 6 marshmallow teeth around curved perimeter of 24 halves. Top with remaining 24 halves. For additional support, an additional marshmallow can be placed behind the teeth. Insert two almond slivers in between teeth for fangs. If fangs do not adhere, dip tips into frosting.

Wednesday, July 6, 2011

No Bake Cookies


This year we had three incredible exchange students. They were here for less than a year, but they were so involved and easy to get along with that it felt like they have been a part of our school forever. Roxy (Poland) and Alona (Russia) became members of our track team this spring. It took quite a bit of convincing to keep them out. That first week, none of them could even make it completely around the track. By the end of the season, we had them running competitively in the 1600m and 800m. With smiles! I am so proud of those girls and am going to miss them now that they are back home. 

At one of our track meets, we had a series of unfortunate events that left us missing one leg of our 4x400 relay. Roxy was our last hope. It took a little bit, but somewhere in the convincing, the idea of no bake cookies came up. So I promised Roxy that I would make a batch if she would run the relay. 

There are a lot of ways you can make no bake cookies, but this is always what I think of when I hear the name. This version comes out of a 4-H cookbook that my home county printed in 2000. These always seem to be the best recipes, don't they?


Combine 1 stick of butter, 1/2 cup cocoa, 2 cups sugar, 1/2 cup milk, 1/2 cup peanut butter and a pinch of salt in a large saucepan. 
Cook and stir until the mixture melts together and starts to boil.
Boil hard for 1 minute. This is important! If you don't boil for at least one minute, the cookies won't set up and you will be left with soup. Not bad, but not a cookie, either.
Stir in 3 cups quick oats and a teaspoon of vanilla.
Stir this all together.
Drop by spoonful onto waxed paper.
I have tried several versions of this cookie, but this is by far my favorite. I think it's the peanut butter. I probably make these once a month and never seem to get tired of them.

Click here for Printable Recipe

No Bake Cookies
1/2 Cup Butter
1/2 Cup Cocoa
2 Cups Sugar
1/2 Cup Milk
Pinch of Salt
1/2 Cup Peanut Butter
1 teaspoon Vanilla
3 Cups Quick Cooking Oats
Combine butter, cocoa, sugar, milk, peanut butter and salt. Cook until the mixture reaches a full boil and boil hard for 1 minute. Take off stove and add oats and vanilla. Stir together and then drop by spoonful on waxed paper. Cool.

Thursday, March 17, 2011

Dragon Cookies

Happy St. Patrick's Day!

While we can't really claim to be Irish, we can certainly appreciate all things green today. The Girl, especially seemed pretty obsessed getting into the proper Irish spirit.

I received a similar recipe in email the other day I think from Betty Crocker, but apparently deleted it. The Kids loved the idea of green cookies, so I adapted my regular chocolate chip cookie recipe as best I could.

Of course since they are green, The Boy immediately thought them to be "Dragon Cookies" and that just sounded better than "Green Chocolate Chip Cookies." He didn't quite get the whole "Kiss me, I'm Irish" thing.

Cream together 1 cup of shortening, 1/2 cup of butter and 2 cups of brown sugar.
Beat in 2 eggs.
And a teaspoon each of vanilla and peppermint extract.
Add in 30 drops of green food coloring. Yes, 30 drops.
Gradually mix in 2 teaspoons baking soda and 3 cups of flour.
Stir in 2 cups Andes mint chips.

Drop by rounded tablespoon on to a parchment lined cookie sheet.

Careful when you open the oven door. Peppermint extract can really clear out the sinuses (and burn the eyes) after it has been baked.
These are yummy. As I was mixing them up, I started second guessing myself on the peppermint extract, thinking it would be too overwhelming. Turns out I didn't have to worry. However, I'm not convinced that you need the peppermint extract AND the Andes mint chips. I think you could get away with just vanilla and the chips or peppermint extract and regular chocolate chips. The way I made them, I'm not sure you can tell that they are Andes chips as opposed to regular chocolate chips. Next time I will probably pick an alternate version just to see.

Click here for Printable Recipe

Dragon Cookies
1 Cup Shortening
1/2 Cup Butter
2 Cups Packed Brown Sugar
2 Eggs
1 teaspoon Vanilla Extract
1 teaspoon Peppermint Extract
3 Cups Flour
2 teaspoons Baking Soda
2 Cups Andes Mint Baking Chips

Cream shortening, butter and brown sugar. Add eggs and beat well. Beat in extracts. Combine flour and baking soda; gradually add to creamed mixture. Stir in chips. Drop by rounded teaspoon onto baking sheet lined with parchment paper. Bake at 350 for 8-10 minutes. Cool for two minutes and remove to cool on a wire rack.

Friday, January 7, 2011

Caramel Chip Bars

A friend recently brought these to a dinner. I knew I had made them before, but had forgotten how wonderful they were. Before I left, I made sure I asked her for the recipe. She gave me kind of a funny look and asked me if I was sure. I asked her what she meant and she said, "Tracie, I am one hundred percent certain that you gave me this recipe!"

Thank goodness for community dinners :)

Melt 32 caramels, a stick of butter and a can of sweetened condensed milk on low heat. Stir this quite often and do not be tempted to up the heat. You have time. Be patient.
In between stirs, mix together a yellow cake mix with two eggs and a half cup applesauce. The recipe says half a cup of oil. You can use that or substitute any portion of the oil with applesauce. I went for 100% here and it worked great. Don't forget to stir your caramel.
Mix in every kind of chip you can find. Almost. Two cups of mini chocolate chips and one cup of vanilla chips. Also a chopped up Heath bar. I didn't have one, but I did have some left over toffee chips from when I made the incredible Toffee Rolls. (Hmmm...in my desire to reacquaint you these, I have discovered that I never posted them. I am SO SORRY. You will see why when I get them up.) Anyway, stir these all into your cake mix.

Go stir!
Spread about 3/4 of the dough into the bottom of a well greased pan and bake for about 15 minutes.
By now your caramel should be getting pretty close to completely melted. Remove it from the heat and let it cool a little bit. DO NOT taste test this. You will just keep coming back and "tasting" more. Before you know it, you will have to start over and make a new batch.
After the 15 minute cook time, let the almost cookies cool for at least 10 minutes. This is important or the soft, not quite done dough will scrunch up. Once it is not so squishy, spread the caramel mixture over the top of the dough.
Use a regular spoon to drop the remaining dough onto the top of the caramel. You want the drops pretty close together. Your goal is to have a fairly solid top with a bit of caramel peeking out at random spots.
Return to the oven for another 30 minutes.
Don't make these.

They are evil.

You have been warned.

Click here for Printable Recipe

Caramel Chip Bars
1/2 c butter
32 caramels
1 can (14 oz) sweetened condensed milk
1 pkg (18 1/4 oz) yellow cake mix
1/2 c vegetable oil
2 eggs
2 c miniature semisweet chocolate chips
1 cup vanilla or white chips
1 Heath candy bar (1.4 oz) chopped

In a large saucepan, combine the butter, caramels, and milk; cook and stir over medium low heat until smooth. Cool. In a mixing bowl, combine the cake mix, oil, and eggs; mix well. Stir in chips and chopped candy bar (dough will be stiff). Press 3/4 into a greased 9 x 13 pan. Bake at 350 for 15 min. Place on a wire rack for 10 min.
Pour caramel mixture over the crust. Crumble remaining mixture onto caramel layer. Bake for 25-30 min or until edges are golden brown. Cool for 10 min; run a knife around edges of pan. Cool 40 minutes longer; cover and refrigerate for at least one hour.