Friday, February 25, 2011

Cream Cheese Clouds

One of the desserts on the menu this month was cheesecake. As you may or may not know, cheesecake is kind of an involved recipe. It takes time. It takes energy. I had neither this week. So instead of actual cheesecake, I found a recipe from Robin Sue that I had saved back before Christmas. She added cherry pie filling to hers, but I didn't have any, so I substituted chocolate pudding.

Beat a block of cream cheese with powdered sugar and vanilla until it is super creamy.
Slowly add in a cup of cream. Cream. Not milk. Not half and half.
Because we are going for fluffy here, and truly, the only way to get there is by using real cream.
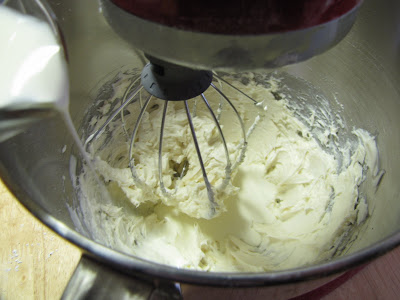
Beat this mixture until you get soft peaks form. Just like you would in whipped cream.
Spoon about a third of a cup of the mixture onto a cookie sheet lined with waxed paper. I was out of waxed paper, too, so I used aluminum foil.
Take a spoon and carve out a little space for the filling.
Freeze this for a couple hours and then fill with pudding. Or pie filling. Or fruit.
You know, I think anything with "cloud" in the name just has to be good, doesn't it? These are wonderful. I left them in the freezer overnight, and that made them really difficult to cut into at first, but they didn't take long to thaw out.

I really want to try these with lemon pudding. The Boy is upset we didn't have cherries, so that will be up the next round.

Click here for Printable Recipe

Cream Cheese Clouds
1- 8 ounce brick of cream cheese
1/2 cup powdered sugar
1/2 tsp. vanilla
1 cup heavy cream
In a large mixing bowl using a hand held or stand mixer, mix together cream cheese, sugar, and vanilla until light and fluffy. Slowly add cream and whip until mixture is whipped to a light and fluffy cloud. Line cookie trays with waxed paper and spoon about 1/3 cup sized mounds of the cream mixture on trays and makes a well in each mound using the back of a spoon. Freeze up to 2 hours on trays then remove to an airtight container to store in the freezer.

Monday, February 14, 2011

Three Cheese-Stuffed Shells with Meaty Tomato Sauce


Sorry about the long name, all I can say is it wasn't me who named it, it is another one of Ree's. I was accused of getting all fancy when I made this. I have been kind of bored with my canned spaghetti sauce and was looking for a new one that didn't sound to difficult. I think I may have found it.


Start your water boiling for the pasta shells.

Brown a half a pound of Italian sausage with a half a chopped onion and a few cloves of minced garlic. Then add in a half a cup of red wine. You can use cooking wine or any red you may have sitting around. Should you be required to open a new bottle, all the better.
Add in your crushed (or diced) tomatoes, a little sugar and a bit of salt. Cover this and simmer for about half an hour.
About now, your water should be boiling, so add in your pasta shells. It is important that you only cook them for half the time. You want them firm enough that you can get them stuffed.

Mix a large container of ricotta, half your parmesan and some romano (or in my case, the Italian blend) cheeses with an egg, salt, pepper and basil.
By this time, your sauce has simmered to perfection, so add about half of it to the bottom of a 9 x 13 pan.

Once your shells have cooled a little bit, stuff them with a heaping tablespoon of the cheese mixture.
Place each shell open side down on top of the sauce. I easily fit 20 shells into my pan.
Cover those with the remaining sauce.
And sprinkle with the remaining Parmesan cheese.
Bake at 350 for about half an hour.

This sauce is insanely delicious. I am so using more wine in my cooking from now on.

I ended up with a few extra shells and a little bit of extra filling. I think this would freeze well, so I am trying that and I will try to remember to let you know how it all worked out.

While this is not really something you can throw together on a weeknight, it is perfect for a lazy Saturday afternoon (or in my case, yet another Snow Day).

Everyone loved this. I barely had any leftovers to take for lunch the next day.

Click here for Printable Recipe

Three Cheese-Stuffed Shells with Meaty Tomato Sauce
20 Jumbo Pasta Shells
30 ounces, Whole Milk Ricotta Cheese
8 ounces, Parmesan Cheese, Grated, Divided
½ cups Grated Romano Cheese
1 whole Egg
1 teaspoon chopped Basil
Salt And Pepper, to taste
½ whole Medium Onion, Chopped
2 cloves Garlic, Minced
½ pounds Italian Sausage
½ cups Red Wine
2 cans Diced Tomatoes
2 Tablespoons Sugar
½ teaspoons Salt
Cook pasta shells for half the cooking time; make sure not to overcook. Drain and rinse in cool water. Set aside.
Brown Italian sausage with onions and garlic. Break the sausage into small pieces as it cooks. Pour in red wine and let it cook for a minute or two.
Add in cans of crushed tomatoes and stir. Add sugar and salt. Bring to a boil, then reduce heat to low. Cover and cook 30 to 45 minutes, stirring occasionally.
In a separate bowl, mix ricotta, half the Parmesan, Romano, egg, salt and pepper and basil. Stir until combined.
Coat the bottom of a baking dish with about half the sauce. Fill each half-cooked shell with the cheese mixture. Place face down on the sauce. Top shells with remaining sauce. Sprinkle on remaining Parmesan.
Bake at 350 degrees for 25 minutes, or until hot and bubbly.

Friday, February 11, 2011

Apple Cream Brunch Biscuits

These snow days are going to kill me.

Well, they are at least going to make me heavier. I wouldn't be surprised to find out that I've gained about 20 pounds this month. I can't help it. When I am stuck inside and it's cold, all I want to do is cook.

I decided to clean out my inbox. I have a folder dedicated to recipes that I want to try and I hadn't really looked through them in awhile. I didn't get very far. The first one I looked at was from Pillsbury. Not only did it feature some incredible looking chocolate recipes for Valentine's Day, it had links to other recipes it thought I might enjoy. It was one of these links that led me toApple Ricotta Brunch Biscuits. This is not really what I made. I didn't have ricotta cheese. I really wanted to try these, but really did not want to get out in the snow. So I substituted cream cheese for the ricotta. I also did not have almonds (I have been making a LOT of granola), so I substituted walnuts.

Mix the cream cheese, sugar and egg until it is nice and creamy.

Have The Girl mix up the walnuts and cinnamon so she doesn't eat all the cream cheese mixture.

Press a refrigerated biscuit in the bottom and up the sides of a greased muffin tin. Cut an apple into 8 wedges and peel each section. The recipe said to put an entire wedge in the muffin tin, but it also told me to use a jumbo muffin tin. I cut my wedges in half since I was using a regular sized muffin tin.

Top each apple with a generous spoonful of the cream cheese mixture.

Sprinkle with walnuts and bake at 375 for 20 minutes.
Let them sit in the pan for a few minutes before using a butter knife to loosen them out.

Oh my.

I did not need to know these existed.

Everyone ate one right out of the oven (be careful, those apples get HOT!) and immediately wanted another. It says to store in the refrigerator, but mine didn't make it that far.

I would also say that while I do not have a comparison here, I don't think I would like these as a jumbo muffin as well. I think next time I will keep them the regular muffin size. I can also see substituting blueberries or peaches for the apple. Oh, or a Hershey's kiss would be divine.

Boy, I really need to go back to school.

Click here for Printable Recipe

Apple Cream Biscuits
1/2 Cup Sugar
1 Cup Cream Cheese
1 Egg
1/4 Cup sliced Walnuts
1/2 teaspoon Cinnamon
1 Refrigerated Biscuits
1 small Apple, peeled, cut into 8 wedges (1/2 inch thick)
Heat oven to 375°F. Spray 10 muffin cups with nonstick cooking spray. In small bowl, combine sugar, cream cheese and egg; beat at high speed for 1 minute.
In small bowl, combine walnuts and cinnamon; mix well. Separate dough into 8 biscuits. Press each biscuit evenly in bottom and up sides of spray-coated muffin cups. Place 1 wedge of apple in each cup. Spoon 2 rounded tablespoonfuls cheese mixture over each apple wedge; sprinkle with walnut mixture.
Bake at 375°F. for 20 to 25 minutes or until biscuits are deep golden brown and apples are crisp-tender. Remove biscuits from muffin cups; cool 15 minutes. Serve warm. Store in refrigerator.

Wednesday, February 9, 2011

Warm Butterbeer


So we are on our sixth snow day of the year. And while being a teacher definitely has it's perks on days like this, I am really sick of snow and cold, not to mention being couped up in the house for days at a time. I went out and shoveled the driveway this morning just so I could escape. It was 7 degrees.

When I came back in, I briefly thought about hot chocolate. We have been drinking so much lately that the suggestion received very little enthusiasm. I went on a kick awhile back (you may remember) in the hot drinks category. I had one more recipe that we hadn't tried yet.

Butterbeer.

For those unfortunate enough to not know anything about the Harry Potter world, go now to your local library and check out the series. I firmly believe that you will want to read them all if you start on the first, so just get them all.

I'll wait.

Back? Okay. Butterbeer is a favorite drink in the wizarding world. J.K. Rowling made it up, but she has said that she imagines it tasting "a little less sickly than butterscotch." There are a lot of recipes out there, especially since the Wizarding World of Harry Potter has opened at Universal Studios in Orlando, so it took awhile to sort through them all and find one that sounded right. We had 10 inches of snow last night, what am I supposed to do?

This one sounded most like what I think Butterbeer should be, plus it is super simple to make.

Add a heaping tablespoon of butterscotch sauce and a tablespoon of cream to a can of Cream Soda. If you are lucky, press the "on" button on your Cocomotion. If not, you can also heat this on the stove or in the microwave.
Enjoy.

This went over really well. We ended up making two more batches before the day was over. This is really sweet, so I added a bit more cream on the second batch and prefer that version. The Kids I don't think even noticed there was a difference.

In the books, too much Butterbeer can make one a little tipsy, especially if you are a house elf. To make this more of adult drink, a shot of butterscotch schnapps is recommended.

Click here for Printable Recipe

Warm Butterbeer
2 Tablespoons Butterscotch Sauce
1 Tablespoons Heavy Cream
1 Can Cream Soda
Mix it all together and heat.

Tuesday, February 8, 2011

Spaghetti Tacos

Why, yes, we do have a tween girl who watches Nickelodeon. However did you know?

For those of you who do NOT have a tween girl, these are from iCarly. There are lots of unusual, creative foods on that show, but The Girl has been wanting to try Spaghetti Tacos for a long time.

The Boy wasn't so sure.
So one day, when we had left over spaghetti, I gave in.

Before you shudder in disbelief, just let me tell you...
...these weren't bad.

They were actually pretty good.

Monday, February 7, 2011

White Castle Sliders


I've never been to White Castle. I had never actually heard about it until that movie came out, and even then I didn't realize it was a real place. I have apparently been deprived in this department.

There are lots of places on the internet with recipes for these adorable little hamburgers. Want to know the really funny thing? I was hard pressed to find any variation at all. Everyone pretty much sticks to the same version. So this must be the right one, right?

Sprinkle a half a cup of dried onions onto the bottom of an 8x8 square pan.
Press a pound of ground beef into a layer on top of the onions.
Sprinkle with seasoning of your choice.
Bake at 400 for about 20 minutes. Then you will need a paper towel to blot some of the extra grease.
Top with American cheese. Pop this back in the oven for a couple minutes so the cheese gets nice and melted.
Cut into tiny little burgers. I made nine.
You can buy mini buns at the grocery store, I think they are called party buns and they come in a couple varieties. I ended up with Hawaiian, which was just a bit sweeter than a regular bun.
These were really good. We eat a lot of hamburgers in this house and it's nice to have a way to change it up. The Boy was delighted to have "hamburger made just for me" and ate several of them (I'm pretty sure he's going through another growth spurt!). The Girl picked off her onions, but still gave a thumbs up. This will go in my book as a great Saturday lunch for when Jeff is gone.

Click here for Printable Recipe

White Castle Sliders
1/2 cup dried onion flakes
2 pounds ground beef
1/2 t. seasoned salt
6 slices cheese
12- small party rolls
dill pickle slices
Evenly spread the onions on the bottom of a 9x13 inch baking dish. Gently press the ground beef on top of the onion flakes. Press evenly making one giant pattie. Sprinkle with seasoned salt. At this point you can use a drinking straw and poke holes throughout the meat. That is what they do with the original white castle sliders. Bake in a 400 degree oven for 20 minutes. Using a paper towel, pat the excess grease from the top of the pattie. Top with cheese, return to oven for 2 more minutes. Remove from oven, let set 5 minutes then cut into patties. Slice open and separate each party roll. Place bottom of rolls on a large platter. Using a spatula lift pattie with onion layer onto each bun bottom. Top each slider with a pickle slice then the bun lid. Serve immediately.

Friday, February 4, 2011

Crock Pot Chicken Lickin


So the last week or so, I haven't even put my slow cooker away. This kind of weather makes me want to hibernate. Since my children will not allow me to do that, the closest I seem to be able to get is snuggling in a blanket with my caramel milk.

There is nothing quite as satisfying as walking in from the cold after a long day at school and breathing in the smells of supper already cooking.

I believe this recipe came through my Google group, so I'm not sure of it's exact origin. Whoever you are, thank you for coming up with this one!

In a large mixing bowl, add all the ingredients - tomatoes, onion, mushrooms, garlic, salt, paprika, ginger and chili powder - everything except the cream.
Mix them all up good.
In a large slow cooker, add 6-8 chicken legs. The recipe says to brown these before adding them in. You will notice that I didn't even get them defrosted, so I skipped that step. I also realize this practice is frowned upon and usually thaw my meat before slow cooking it. Actually, I put this in the microwave and thawed them before moving on. I will do better in the future.
Add your tomato mixture on top of the chicken legs. Cook on low for 8-10 hours. I cooked mine for 6 hours, but my slow cooker seems to run pretty hot.
Just before serving add in 1/2 cup of heavy cream.
Stir it all up and serve over hot noodles.
The sauce didn't really thicken up like I would have liked it to, so we kind of made it into more of a soup than a pasta dish. Either way, it's delicious.

Click here for Printable Recipe

Crock Pot Chicken Lickin
8 chicken legs, thighs and/or breasts
1/2 teaspoon ground ginger
1/2 teaspoon chili powder
3 tablespoons butter
1 (16 ounce) can whole tomatoes
1 large onion, chopped
1 (4 ounce) can mushrooms, drained and sliced
1 clove garlic, minced
1 1/2 teaspoons salt
1/2 cup heavy cream
2 teaspoons paprika
Rinse the chicken parts and pat dry. Melt the butter in a skillet. Brown the chicken on all sides in the butter. Place the chicken in a crock pot.
Combine all the other ingredients except the cream together. Mix well. Pour over the chicken. Cook on LOW for 8 to 10 hours.
Stir in the heavy cream just before serving.
Serve over hot spaghetti.

Wednesday, February 2, 2011

Toffee Rolls


I made these awhile back at a time where I didn't know whether I was coming or going. I apparently threw the recipe back in the pile and forgot about them. I am stunned by this because these are heavenly. Also not so stunned because I think I ate half the batch before I told anyone else they were done.

Yeah, these are really good.

And really easy.

Have The Boy mix the butter, brown sugar, cinnamon and toffee bits together while you lay out a package of refrigerated crescent rolls.
After you seal all the perforations, spread that butter mixture evenly across the top.
Roll them up and cut them into 1 inch slices.
Bake at 375 for about 15 minutes.
Mix up some icing using powdered sugar, milk and vanilla and drizzle over the rolls.
Did I mention these were good?

Click here for Printable Recipe

Toffee Rolls
6 tablespoons butter, softened
1/2 cup packed brown sugar
1 teaspoon ground cinnamon
1/3 cup Toffee Bits or almond brickle chips
2 tubes (8 ounces each) refrigerated crescent rolls
1 cup confectioners' sugar
4-1/2 teaspoons whole milk
1/4 teaspoon vanilla extract
In a small bowl, cream the butter, brown sugar and cinnamon until light and fluffy. Stir in toffee bits.
Separate each tube of crescent dough into four rectangles; seal perforations. Spread evenly with butter mixture. Roll up each rectangle jelly-roll style, starting with a long side.
Cut each into six 1-in. slices; place cut side down into two greased 8-in. square baking dishes. Bake at 375° for 14-16 minutes or until golden brown.
In a small bowl, combine the confectioners' sugar, milk and vanilla until smooth. Drizzle over warm rolls. Yield: 4 dozen.